


I 'm moving slowly but the chest is taking the form of an 18 wheeler in robot form :) . The main windshield pieces are mostly finished only minor details left. I will not glue those parts in place until I finish the shoulder pieces as I need to see how my pieces will fit over them.
Estoy avanzando lentamente pero el pecho ya esta tomando forma de camion tractor con forma de robot :) . El parabrisas esta practicamente terminado salvo pequeños detalles. No pegare estas piezas al modelo hasta que arme las partes que forman los hombros ya que necesito ver como quedaran encima de ellas.
 Here are both pieces on their proper place.
Aqui estan ambas partes en su respectivo lugar.

Here we can see all the layers that will form the right windshield.
Aqui podemos ver las todas las capas que formaran el parabrisas derecho.

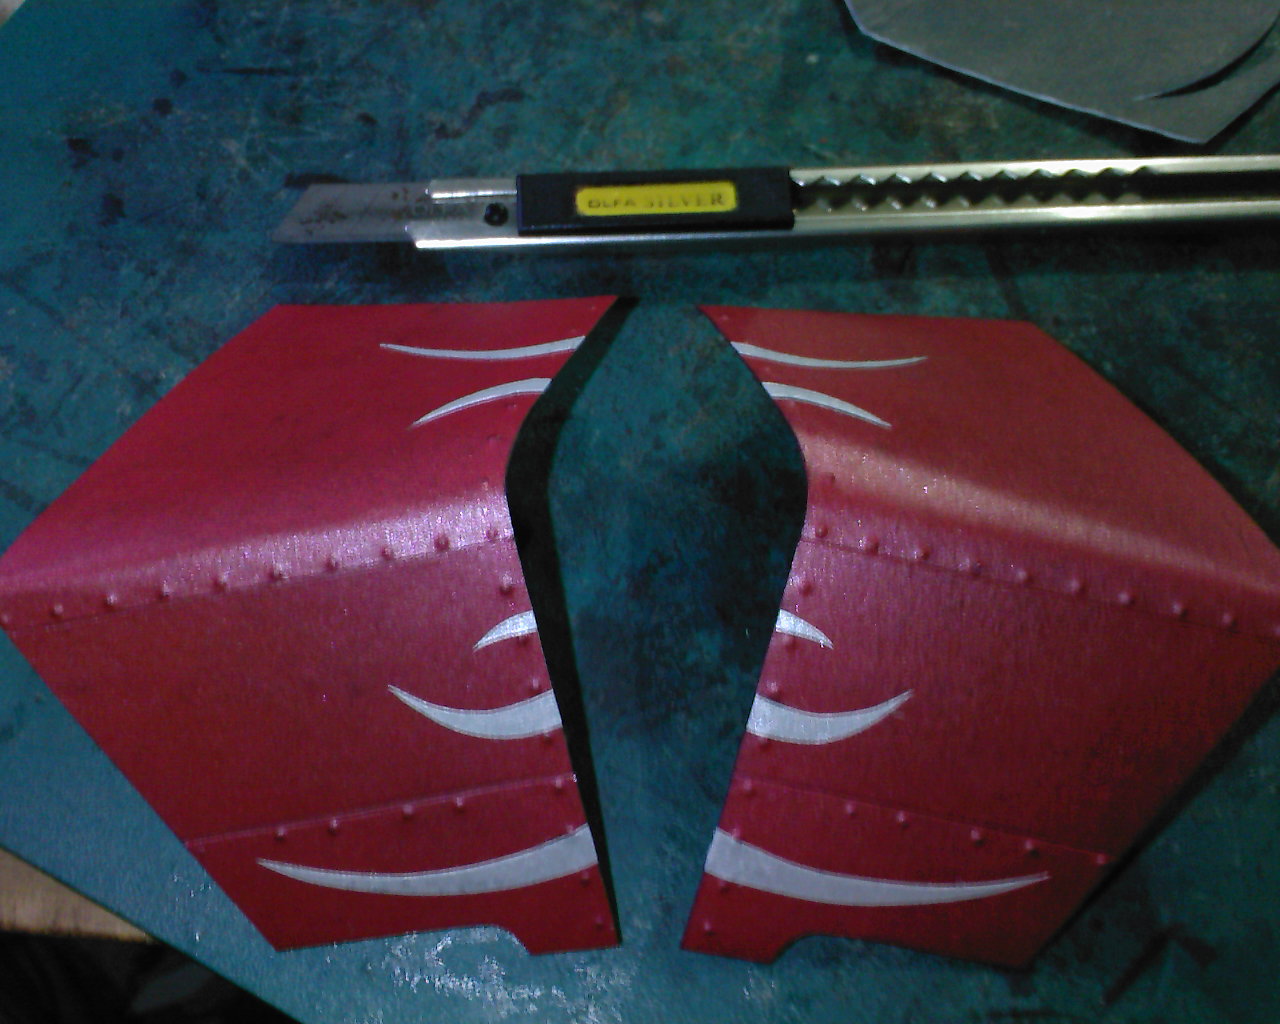
Red flames over silver ones to create the rim.
Flamas rojas sobre las plateadas para crear el borde.

The varios piece that will make the windshield. left to right, bottom base, first and second layer.
las pieces que formaran el parabrisas. Izquierda a derecha, base, y capas 1 y 2.

Added little rivets under windshiel frame and windshield wiper in place.
Añadi los remaches debajo del marco de el parabrisas y limpia parabrisas en su lugar.
Side doors and shoulder pieces started, coming up on the next post...
Puertas laterales y partes del hombro, proximamente en la siguiente publicacion...

I finished the little autobot logo for the central part, each silver element cut out individually then pasted on red paper.
Termine el pequeño logotipo de los autobots para la parte central. Cada elemento en plata cortado individualmente y luego pegado en la papel rojo.

I finish the blue flames on the side by cutting out each blue part slightly smaller than the silver ones to create a rim around it.
Termine las flamas azules cortando las piezas ligeramente mas pequeñas que las partes plateadas para crear un pequeño marco alrededor de ellas.
Finished all silver parts ready for blue parts.
Termine todoas las partes plateadas listas para recivir las partes azules.

I start the flames by cutting out each single flame on silver paper and paste it directly on the main red part.
Comenze las lfamas cortanto cada pieza de color plata y pegandolas directamente en la parte roja principal.

Here are the finished red parts in place.
Aqui estan las partes rojas terminadas pegadas en su lugar.
Ok, so I'm continuing the build of the main chest pieces. I am working really slow on this set of pieces because to me they are one of the most important pieces to get right for the overall movie Prime look. I'm still using my metallic paper for all the parts and weathering with a black pen. there are no textures on the parts so to make them I use a printout of the available photographs of movie Optimus prime I can find. I start by cutting up each individual detail an applying it to the main piece with the basic shape of the part. After I get all of the details glued in in their respective layer( bottom= base piece, middle= detail parts, and top= details of the details, if that makes any sense) Finally I apply the metallic paper coated with enough water based glue. It's important for it to be water based so that the wet paper will take the shape on the "mold" below it. To make sure I apply enough weight I stand on the piece to put all of my body weight on it. It looks pretty good I think.
Continuo con el armado de las partes principales del pecho. Estoy trabajando relativamente lento en estas partes ya que para mi es muy importante que estas partes queden bien para que se paresca a el Optimus Prime de la pelicula. Sigo utilizando el papel metalico paa todas las partes y "envejeciendolas" con un marcador negro. Las partes no tienen texturas asi que las hago imprimiendo las fotografias disponibles del optimus prime de la pelicula que puedo encontrar. comiezo a recortar los detalles y los pego a la pieza principal con la forma basica de esa parte. despues de que pego todos los detalles de esa capa( capa abajo= parte base, capa media= detalles, capa superior= detalles de los detalles, si es que tiene algo de sentido.) Finalmente aplico el papel metalico lleno de pegamento a base de agua. Es importante que el pegamento sea a base de agua para que el papel humedo tome la forma del molde debajo. para asegurarme que haga suficiente presion pongo todo mi peso corporal parandome en la pieza. Creo que quedan muy bien.

This are my main chest pieces taking form. In this picture it's easier to understand how the method I described above works, and again I tried to make' em as close as the movie Prime as it's possible with paper at this scale.
Aqui las partes principales del pecho estan tomado forma. En esta foto es mas facil entender el prosedimiento que describi arriba, y de nuevo, estoy intentando poner el mayor numero de detalles que son posibles al construir con papel a esta escala.

Another look of the back with my own design smokestacks.
Otra vista de la espalda con los escapes que yo mismo diseñe.

here is a close up of the first metal embossed panel applied. notice the rest of the sides of the piece are bare.
Aqui esta un acercamiento de la parte central con el primer panel metalico aplicado. Noten que todos los demas lados estan sin nada.

Here is the basic layer details below the metallic paper to create the embossed effect. white parts base layer gray cut outs middle layer and autobot logo two more layers.
Aqui estan los detalles basicos que se encuentran bajo el papel metalico para crear el efecto de relieve. Parte blanca es la base, parte gris es la capa media y el logotipo de autobots dos capas mas.

Here is another view of the pieces noticed that the autobot logo is missing, but in the works below the center piece.
Aqui esta otro angulo de las piezas. Noten que le falta el logotipo de los autobots pero ya estoy trabajando en el.
Hi, I have been busy this past week so I haven't been able to work as much as I wanted on the model. I had a little problem with one of the leds on his eyes so I decided to continue building the body to get the wiring correct and come back to the head in the end. I decided to star with my own enhanced chest piece. Since this model is going to be smaller than the original I needed to figure out how to make pieces stronger, specially the flimsy ones. I opted to fill up the piece up with riped tissue paper. I had to put a lot to completely fill the whole piece. It's a little anoying but is worth it, especially since I will be applying metallic paper panels over the piece and I need to press on it. I will do this for all load bearing pieces, mainly all joints. They are rock solid with almost no extra weight added.
Estuve un poco ocupado la semana pasada por eso no habia podido trabajar en este madelo tanto como quisiera. Tuve un pequeño problema con uno de los leds en la cabeza asi que decidi continuar con el armado del cuerpo para poner todoel cableado correctamente y despues regresar a la cabeza al final. Decidi empezar a armar mis parte central del pecho mejorada. Ya que este modelo va a ser mas pequeño que el original necesitaba encontrar una manera de fortalezer las piezas fragiles del modelo. Despues de mucho pensar decidi rellenar la pieza con papel sanitario rasgado. tuve que usar mucho para llenar completamente la parte. Es un poco atareado pero vale las pena especialmente porque esare aplicando pameles de papel metalico a las partes y necesitare hacer presion sobre ellas. Voy a hacer esto con todas las partes que cargen peso, principalmente todas las uniones. Quedan solidas como una roca y no añaden practicamente nada de peso.

This is my main chest piece during the fill up process.
Aqui esta my pieza principal mientras la relleno.

I applied metallic paper to most pieces. Looks better in person.
Aplique las partes metalicas a casi todas las piezas. Se ve mejor en persona.

Another view of the back. I also cut out the details to make them stand out more.
Otra vista de la espalda. Tamibien corte los detalles para que se notaran un poco mas.

Holding it in my hand for size comparison. It was a little difficult to paste the individual strips of paper for the rib pieces but it came out OK.
Sosteniendolo n la mano para que comparen el tamaño. Fue un tanto tedioso pegar las tiritas individales que forman las "costillas" pero quedaron bien.

Here is my chest piece in the works with my ring for size comparison.
Aqui esta la pieza central del pecho con mi anillo para comparacion del tamaño.
|
I decided to start with head. I'm using a metallic paper called Stardream which gives a very nice metal look for the robot. I cut out some alien lettering on the side of the face shield. Decidi comenzar con la cabeza, estoy utilizando un papel metalico llamado stardream el cual le da un look metalico al robot. corte unas letras alienigenas en el escudo de su cara. |
|
I cut out some holes on the original part for the eyes and put in a pair of blue led lights, I also added some paper strips around the eyes to make it a little more accurate. Corte unos agujeros en la pieza original de los ojos para poner un par de luces led azules, tambien añadi algunas tiras de papel alrededor de los ojos para que se viera mas como el original. |
Here it is with the led lights in place it looks nice but i didn't like that it looks to simple. Aqui esta con las luces led en posicion se ve bien pero para mi punto de vista muy simple. |
 |
I made some more detail for the eyes I think it looks much better now. aumente un poco el detalle de los ojos creo que se ve mucho mejor ahora. |
 |
This is what I have so far. Esto es lo que tengo por el momento.
|

Hi I will start my Blog with the building process of the paper model of Optimus Prime Designed by Julius Perdana of Paper-replika.com and enhanced by me. The model is roughly 1.3 meters tall and uses over 200 letter sized paper pages. However after much thought on the subject I decided to do build it at half the original size so that it will not take much space. It will definitely be a challenge since I will try to put as much detail as possible.
Hola comenzare mi Blog con el proceso de armado del modelo de papel de Optimus Prime Diseñado por Julius Perdana de Paper-replika.com y mejorado por mi. El modelo es aproximadamente 1.3 metros de alto y utiliza mas de 200 hojas tamaño carta. Sin embargo despues de mucho pensarlo decidi armarlo a la mitad del tamaño original para que no ocupe tanto espacio. Definitivamente no sera tarea facil ya que intentare poner el mayor numero de detalles que sean posibles.


